Welcome to RAW Works. My name is Raymond and I live in the western suburbs of Sydney. This blog will be a portal for me to photo-document the wheels I refurbish and repaint. This is only a side hobby for me so there won't be any crazy custom jobs! My skills have only stretched so far as to using body repair materials, resprays and polishing, so anything that requires welding and unbuckling will be beyond what I can do. I hope to improve on my current skills as I go along, and as a lover of wheels, it's a way for me to express my art side as well as giving life to some tired wheels again.

At the moment, I'm just scouring through eBay for damaged wheels selling for cheap. If you have any wheels you don't need anymore, throw me an email/comment. At the moment I'm just buying sets of wheels to refurb then sell them off. I prefer not to do personal jobs/requests as I don't trust myself with that yet! But that said, pass me an email/comment if you need any help wheel-wise.

My Facebook page is @ http://www.facebook.com/raysalloywheelworks/, please "like" it!

Cheers.

Oct 8, 2010

Art project VII - Show time!

What a day! The wheels went down a storm (though some were sceptical that they were actually wheels; even some thought they were hub-caps! Sad-face)! Having others colour in the BBS was awesome and most people I talked to really enjoyed it.

Some pics :)


Oct 7, 2010

Art project VI - Wheel stands

Yesterday was immense. I gave Bunnings a quick visit in the morning to get some wood to use for wheel stands. I ended up ditching the idea to use different wood as it was just too hard to get done with the amount of time I had left. I didn't get started on the wheel stands 'til later in the afternoon as I had work for most of the day. Being an unexperienced wood-worker, it took me much longer than anticipated to make the wheel stands, but Dad was at hand to help so I did end up getting some sleep haha. I don't think the neighbours were too happy but there were no complaints!


I didn't take any photos during the whole process though so this entry will not be very interesting, but I did wake up early today to give it a quick paint (have some spare black spray paint lying around) and a test fit to make sure it doesn't tip over or break on me during the Marketplace. We used a lot of Liquid Nail, actual nails and even screws, so it shouldn't fall apart *touch wood*.

Here's some after photos.


A few more hours until my Marketplace commences. I'm pretty damn excited! Hope all goes well and others can appreciate this kind of work :)

Oct 5, 2010

Art project V - Polishing

So I forgot yesterday was a public holiday. The sodablaster wasn't open until today. And gosh am I tired. My back aches, my fingers feels like they're under rigor mortis, and I think I've ingested way too much aluminium particles. But I got it all polished up. And I'm completely drained. Here are some pics. I'm not gonna bother explaining what I did in each step, a brief caption will do.

Back from the powdercoaters. Note the surface:


My working area:


Comparison of lips. After 240 grit sanding vs. raw sodablast.


Close-up of post-240 grit sanding:


Close-up of post-600 grit sanding:


Close-up of post-1500 grit sanding:


I sanded from 240 grit, then moved on to 400, 600, 800, 1000, 1500 and finally 2000.

This was after polishing with black and white compound. Note the smudging:


And finally, finished it off with Mothers Mag Polish:


Comparison of lips. Raw sodablast vs. fully polished:


Far from perfect, but time was against me. I spent too little time with sandpaper grit 240 and 400, hence the leftover scratches you can see between the bolt holes, and the rough spots where the lip bends.

Anyway, tomorrow I do the wheel stands. Hopefully I can get Dad to help me out!

Sep 30, 2010

Art project IV - Disassembly and sodablast

So today I decided to disassemble the Work CV wheel. I had started on polishing the lips a few months back, so I had the hardware taken off. The wheel was in horrible condition though, as I had left it sitting outside. Anyway, it was a really sunny and warm day today so I left the wheel to sit in the sun for about a half hour. With the Work CV, the wheel pieces were arranged with the centre-piece sandwiched between the inner and outer:


You can see the factory sealant between the pieces. I left it in the sun to warm up the sealant so it could come apart more readily. It worked, with some mallet persuasion :)


It was surprisingly easy to take off; the BBS RS wheel I had disassembled about a year ago was impossible (I ended up taking it to a wheel specialist to knock it off for me). The centre-piece took a bit more effort to knock off the inner section though (sealant may have cooled down) but a couple of hard whacks and it was off:


Absolutely no dramas at all, save for the outer piece hitting me in the shin (and bruising it haha) when I was knocking it out. Gotta be more careful next time.

I took all the pieces (including the bits for my BBS RS) to a sodablaster (Advanced Soda Blasting located in Blacktown) to completely strip them all back to clean metal. They'll do an infinitely better job than what I can with a drill and flapper wheel. I'm expected to pick them up tomorrow afternooon :)

Oh, and I also received these in the mail earlier this week :D


I've also decided to only do two wheels. Three wheels will take too long to complete and will also take up too much space. So I'll be ditching the rusted steelie...

Sep 27, 2010

Art project III - What to use as wheel display stands?

I've been thinking about this for a long time. What can I use to hold up the wheels? I did some quick searching and remembered that there have been examples of 3-piece wheels being used as trophies for some car shows. This is a fantastic example:


It's simple, robust, and just looks perfect for a 3-piece wheel. Only problem is that it could be expensive to make as I'm not handy with a welder, nor do I have contacts to get sheet metal readily.

Another cool example that I found used existing car parts:


I don't have spare hubs but I do have rotors lying around, but again, the same issue applies here that was in the first one - welding is required and I'll need 3 of each part to make the stand, which I don't have at home.

I've posted up my dilemma online on some discussion boards I frequent (VWWatercooled Australia, and Wheel-Whores.com). I got some helpful feedback from the former - using wood! I gathered the ideas that were discussed and came up with what you see below (bottom of the picture):


Not very space efficient but it will do the job and will do it cheaply as I can just buy some pieces of MDF from Bunnings and saw + nail away as I've got the tools at home already. Basically it'll look like a mini lectern with a long base. The wheel will be mounted up on the wood plate on the top, angled at around 70 degrees. The wheel will be bolted on through the plate (I will drill some holes). The stand will roughly be 30 cm high, and the base will be long enough to support the weight of the wheel without falling over. Basically there will be three main pieces, and each of them will be nailed in together. I'm still deciding on what the finish of the stand will be. Easy thing to do is to paint each of them black. More time-consuming would be to finish them in a way that is indicative to the wheel they're displaying:

Splintered/aged wood for the rusted stage:


Raw but sanded wood for the prep stage:


Varnished wood (pine? beech? Any wood that has that ring appearance) for the completed stage:


I like where this is heading so far!

Sep 26, 2010

Art project II - Changes

OK I haven't yet started on the project yet (I gotta get my car running first) but I've decided to change a few things. First of all, 4 wheels may be a little excessive and seeing as the venue of this creative depiction project is to be at my regular tutorial classroom, space will be limited. I'm gonna reduce it down to 3 wheels; the sandblasted and prep stage will be combined together. I've decided not to use the SSR Reverse Mesh as I don't have that wheel in my possession.

I did a new sketch:


All 3 will have props. The rusted stage will have a bottle labeled hydrogen peroxide. The prep stage will have assorted sandpaper in different grits. The completed stage will have a ratchet and spanner as well as polishing paste and a rag. The reason for including the ratchet and spanner is that I'm thinking of assembling the polished lip for the completed stage mid-way through the exhibition, after I have a decent amount of "creative input" from others. I don't really want the lips to be streaked with paint either!

I've got approximately a fortnight to knock this project out. Sometime this week I'll have to get the Work Equips and BBS RS sodablasted and start on the polishing. I'll also have some fun destroying the steelie!

Sep 18, 2010

Art project - Progression of rebuilding a wheel

I'm currently enrolled in a BSc course, but as a submajor, I've enrolled in teaching units. The first unit I'm taking under this submajor is "Learning and Creativity". As a part of the unit, I have to produce a creative depiction of what learning and creativity means to me - as a student and, eventually, as a teacher.

I've chosen automotive "art" as my outlet, using wheels as my medium. There's a whole range of things that made me choose this - it'll be unique (comparing with others in my class), it's related to something I'm passionate as well as knowledgeable about, and strangely it really does encompass some of my views in successful learning as well as the possibility to introduce creativity into a teaching lesson. Basically, I'll be creating a display involving a number of wheels through the stages of a rebuild, from being a used (battered and neglected) wheel, through repair and preparation to the final stage of painting and polishing.

Here's a quick sketch of what I'd like to exhibit. These were just ideas I had in my head since Thursday:


I think displaying 4 wheels would illustrate best the 4 main stages when building a wheel. I have 3 different wheels in-house already (from my "collection"); the SSR Reverse Mesh is going to be provided by a friend who offered minutes after my Facebook post about this project haha. Here are the actual wheels in photos:

My Mk4 Golf 15" standard wheels (made from steel so can be rusted out for that "used" effect). Not a 3-piece wheel but it'll best show the tatty-look I'm going for, since I don't think any 3-piece wheels are made in mild steel.


SSR Reverse Mesh - they'll be sandblasted completely, reducing the finish the bare metal with a finish similar to being sanded down by ~100 grit sandpaper (coarse).


Work Equips - these will also be sandblasted, but I'll be following it up with some filler for the centres (if required) and primer. The lips will be partially polished (to show that graduation effect from sandblasted to bare metal to polished up to a mirror finish).


BBS RS - those who know me, know that I consider these the ultimate set of wheels, and it's no surprise I want to use them to portray the finished product. They will be sandblasted, primered and painted in standard wheel silver, and the lips will be polished to a mirror finish.


I can't wait to get this started!

BBS RSII Part 5 - Premature leave

I ended up selling the wheels soon after SEDF, as well as the adapters. I kept the tyres though. Looks like the big plans I had for the RSIIs ended up being abandoned. Ah well, another set of wheels surely...

Feb 3, 2010

BBS RSII Part 4 - Shits and giggles

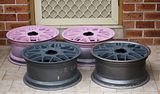
Besides white paint and bumper black, I had primer grey and spray putty pink lying around. I was seriously running out of time so getting a good cleared and glossed finish was out, especially with my track record of painting. So I decided to go half grey, half pink :)

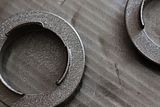
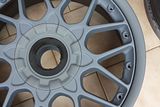
Firstly, I had the centres soda-blasted. Saved me the messiness of using paint stripper and hours of sanding:


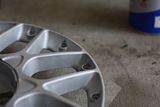
The finish was damn clean, it was tempting to rock raw alloy, but I would've needed to finish off polishing the lips and I just couldn't be bothered at that point.

On goes the primer grey. The same was done for the pink:


I also pulled apart the centre lock:


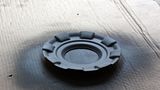
And used what I had left of the wrinkle paint:


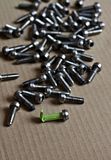
Bolts were cleaned, taped up and sprayed black (ghetto, I know):


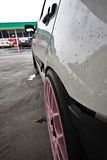
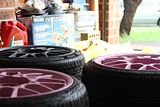
Bolted them back up together, and this was the result (minus tyres):


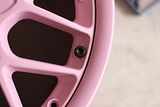
To be honest, I was going nuts over the grey centre with polished lip, as well as the pale pink of the spray putty.

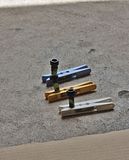
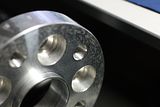
Anyway, I managed to find those conical bolts for the adapters - I had to have 10 of them shortened for the 15mm adapter as they would poke through and foul on the mounting surface of the rotor. Here are the adapters:


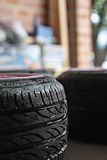
To tie it all up, I had to get a set of no-compromise tyres, something that would stretch beautifully over the 17x8's and provide me the clearance I needed for the rears (sitting at ET10 on stock guards). I found a set of Pirelli Pzero Neros in 195/40R17, a rare size in Australia. 205/40's are readily available but I was going to settle for those.

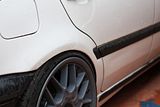
When I went to pick them up, I was amazed by how small the sidewall looked! But mounted up, they had a nice stretch and looked awesome:


So next was to fit them onto the Mk3 and rock it down to Melbourne:


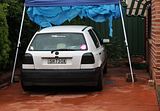
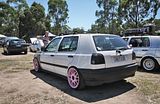
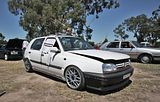
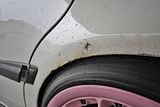
Rear tyres were raped by the guards though. But like they all say, if you ain't rubbin'...