Welcome to RAW Works. My name is Raymond and I live in the western suburbs of Sydney. This blog will be a portal for me to photo-document the wheels I refurbish and repaint. This is only a side hobby for me so there won't be any crazy custom jobs! My skills have only stretched so far as to using body repair materials, resprays and polishing, so anything that requires welding and unbuckling will be beyond what I can do. I hope to improve on my current skills as I go along, and as a lover of wheels, it's a way for me to express my art side as well as giving life to some tired wheels again.

At the moment, I'm just scouring through eBay for damaged wheels selling for cheap. If you have any wheels you don't need anymore, throw me an email/comment. At the moment I'm just buying sets of wheels to refurb then sell them off. I prefer not to do personal jobs/requests as I don't trust myself with that yet! But that said, pass me an email/comment if you need any help wheel-wise.

My Facebook page is @ http://www.facebook.com/raysalloywheelworks/, please "like" it!

Cheers.

Oct 8, 2010

Art project VII - Show time!

What a day! The wheels went down a storm (though some were sceptical that they were actually wheels; even some thought they were hub-caps! Sad-face)! Having others colour in the BBS was awesome and most people I talked to really enjoyed it.

Some pics :)


Oct 7, 2010

Art project VI - Wheel stands

Yesterday was immense. I gave Bunnings a quick visit in the morning to get some wood to use for wheel stands. I ended up ditching the idea to use different wood as it was just too hard to get done with the amount of time I had left. I didn't get started on the wheel stands 'til later in the afternoon as I had work for most of the day. Being an unexperienced wood-worker, it took me much longer than anticipated to make the wheel stands, but Dad was at hand to help so I did end up getting some sleep haha. I don't think the neighbours were too happy but there were no complaints!


I didn't take any photos during the whole process though so this entry will not be very interesting, but I did wake up early today to give it a quick paint (have some spare black spray paint lying around) and a test fit to make sure it doesn't tip over or break on me during the Marketplace. We used a lot of Liquid Nail, actual nails and even screws, so it shouldn't fall apart *touch wood*.

Here's some after photos.


A few more hours until my Marketplace commences. I'm pretty damn excited! Hope all goes well and others can appreciate this kind of work :)

Oct 5, 2010

Art project V - Polishing

So I forgot yesterday was a public holiday. The sodablaster wasn't open until today. And gosh am I tired. My back aches, my fingers feels like they're under rigor mortis, and I think I've ingested way too much aluminium particles. But I got it all polished up. And I'm completely drained. Here are some pics. I'm not gonna bother explaining what I did in each step, a brief caption will do.

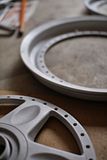
Back from the powdercoaters. Note the surface:
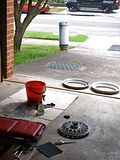

My working area:


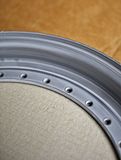
Comparison of lips. After 240 grit sanding vs. raw sodablast.


Close-up of post-240 grit sanding:


Close-up of post-600 grit sanding:


Close-up of post-1500 grit sanding:


I sanded from 240 grit, then moved on to 400, 600, 800, 1000, 1500 and finally 2000.

This was after polishing with black and white compound. Note the smudging:


And finally, finished it off with Mothers Mag Polish:


Comparison of lips. Raw sodablast vs. fully polished:


Far from perfect, but time was against me. I spent too little time with sandpaper grit 240 and 400, hence the leftover scratches you can see between the bolt holes, and the rough spots where the lip bends.

Anyway, tomorrow I do the wheel stands. Hopefully I can get Dad to help me out!